Complete case administration tasks in MyHMCTS
Updated 20 September 2024
1. Before you start
Before you can use MyHMCTS, you and your organisation must have completed other steps.
- Registered your organisation with MyHMCTS
- Set up your MyHMCTS user account
Read the MyHMCTS registration guidance for further information and instructions. If your organisation has an account already, contact the existing administrator to arrange for your account creation.
Once you have a MyHMCTS account, you can sign in to manage a case or to manage an organisation using your email address and password.
2. Share a case
Sharing a case with another user in your organisation gives them full access to view and progress the case. Sharing cases makes sure the organisation does not lose access to the case if you leave the organisation.
You cannot transfer cases, only share them. For services where the share a case functionality cannot be used, the case will revert to paper if you leave the organisation.
1. Select ‘Case list’ from the black banner, then use the filters to find and select the case that you want to share.
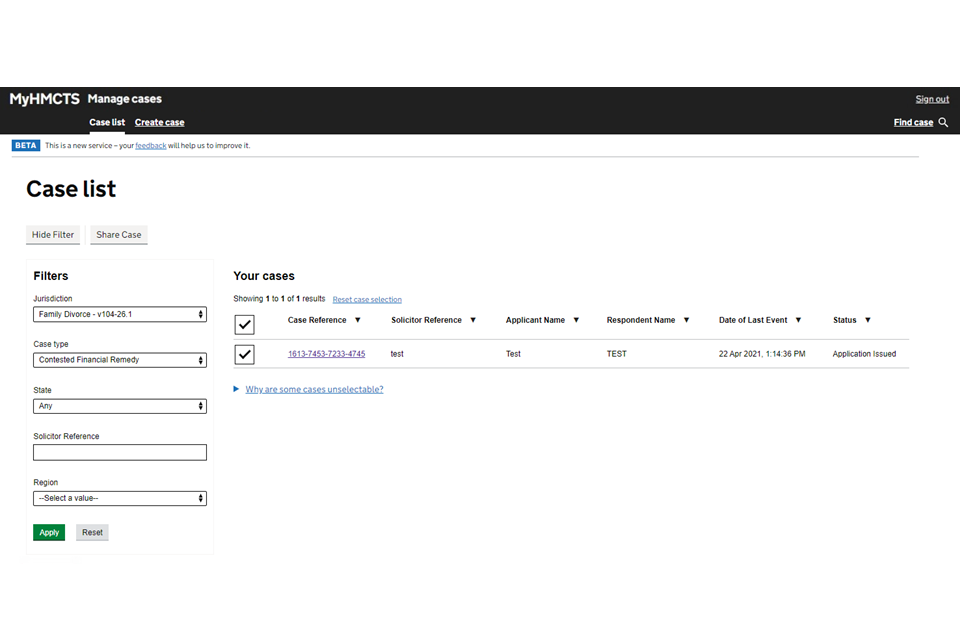
You can now share a divorce or probate case in an unsubmitted state (this is not available for other services). The solicitor or probate practitioner who drafted the case must sign in to share a draft case. From the ‘State’ filter select ‘Draft’ or another relevant unsubmitted state. Select other relevant filters and then ‘Apply’. Only draft cases will appear in the results. You can then take the same following steps as cases in other states.
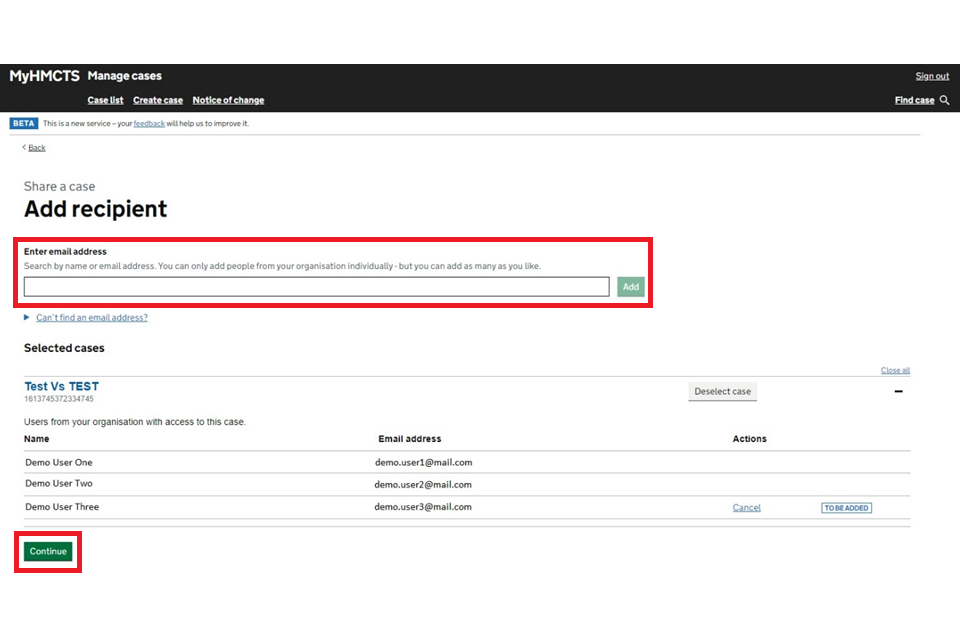
2. In the ‘Add recipient’ screen, enter the email address of the colleague who you want to share the case with. They must be MyHMCTS users for you to add them. Select ‘Add’. Repeat to add as many users to the case as you need. When you have added all users, select ‘Continue’.
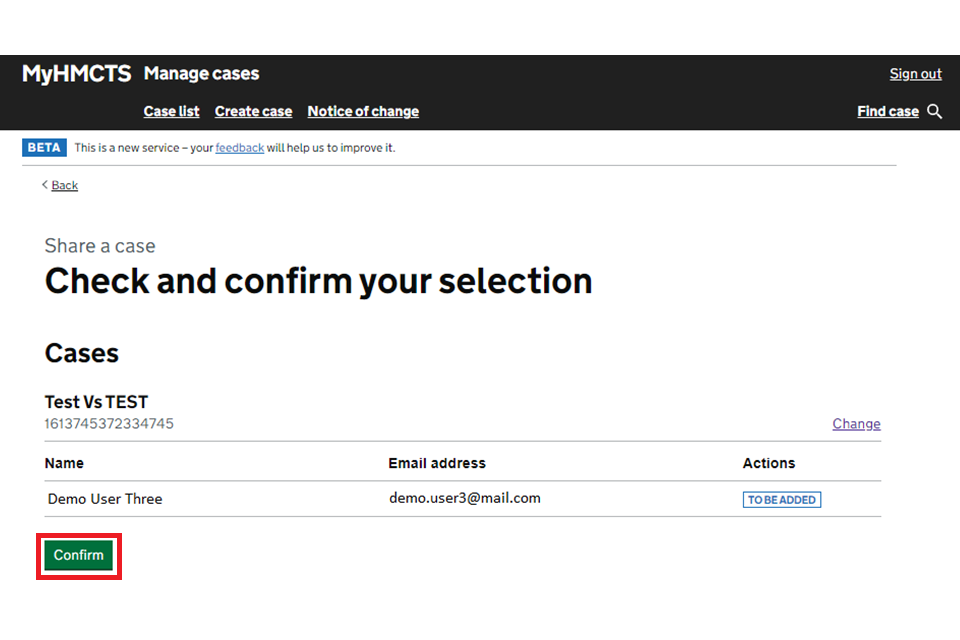
3. In the ‘Check and confirm your selection’ screen, check that you are adding the correct user or users to the case and then select ‘Confirm’.
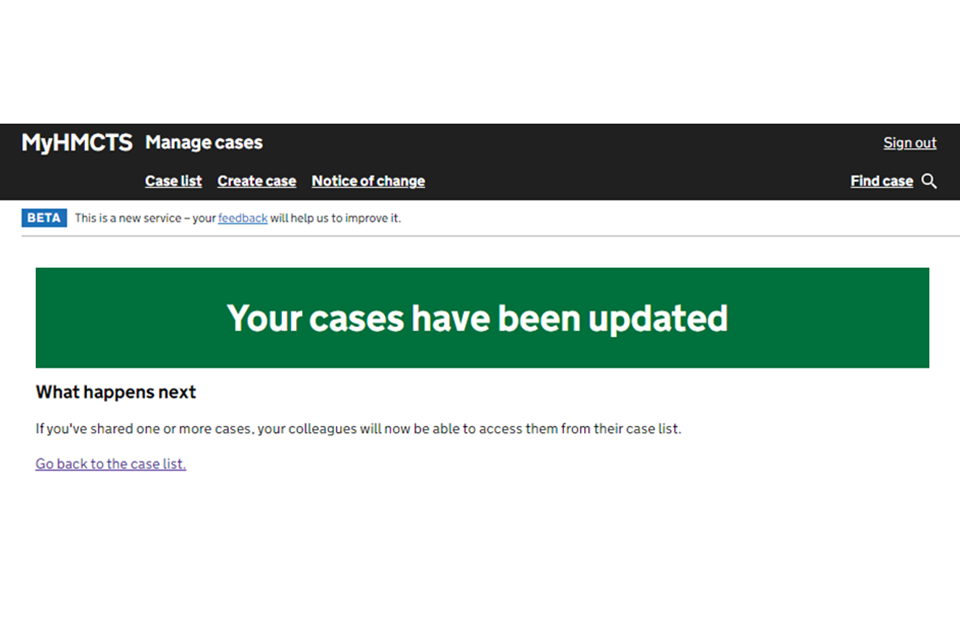
4. The case will be added to each user’s case list. You will see a screen that says your cases have been updated.
3. Assign a case access administrator
Only case access administrators (CAAs) can allocate unassigned cases served on your organisation to the relevant users.
If your organisation is representing a respondent in a case, the digital case file will be submitted by the applicant’s solicitor. The file will appear under the ‘unassigned cases’ tab, accessible only to a CAA. They will need to assign this case to a solicitor in your organisation.
Anyone can be the CAA, and every organisation should have one or more nominated CAA. You can assign CAAs at the invite a user or update a user stage – see our guide on how to manage user accounts.
4. Accept and assign a case
Only a case access administrator (CAA) can accept and assign a case to a solicitor. They can do this by logging into manage an organisation. The applicant’s solicitor will have entered an email address for your firm when they set up the case on the system.
1. Find the cases sent to your firm in the ‘Unassigned cases’ tab.
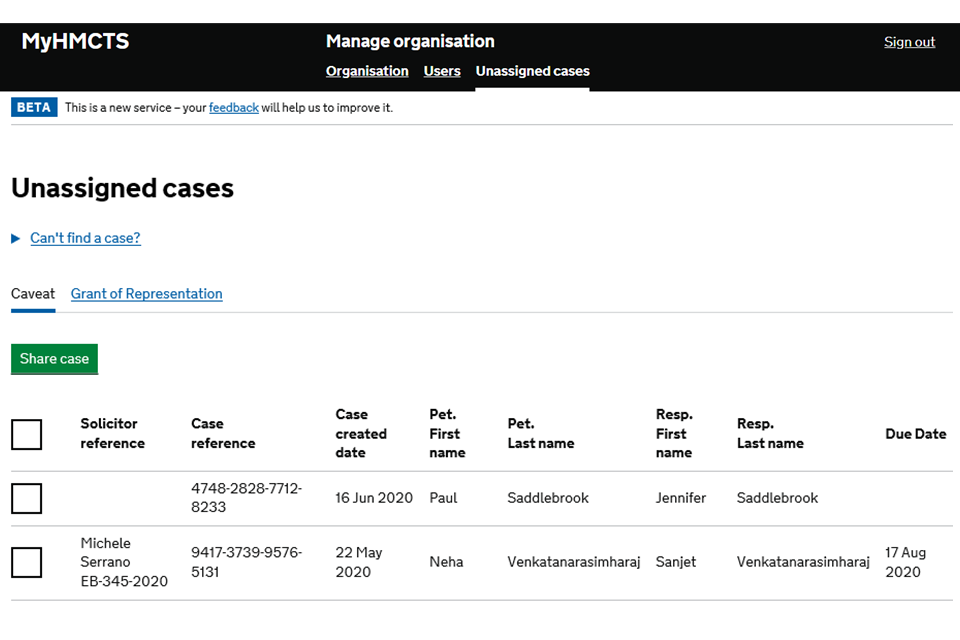
2. Cases are grouped by case type in separate tabs. The tabs you see will depend on what cases have been assigned to your firm. Choose the appropriate tab to show a list of cases.
3. You will only be able to view basic case details (like a service letter). This should be enough for you to assign it to the right user. Check the box next to the case and then select ‘Share a case’.
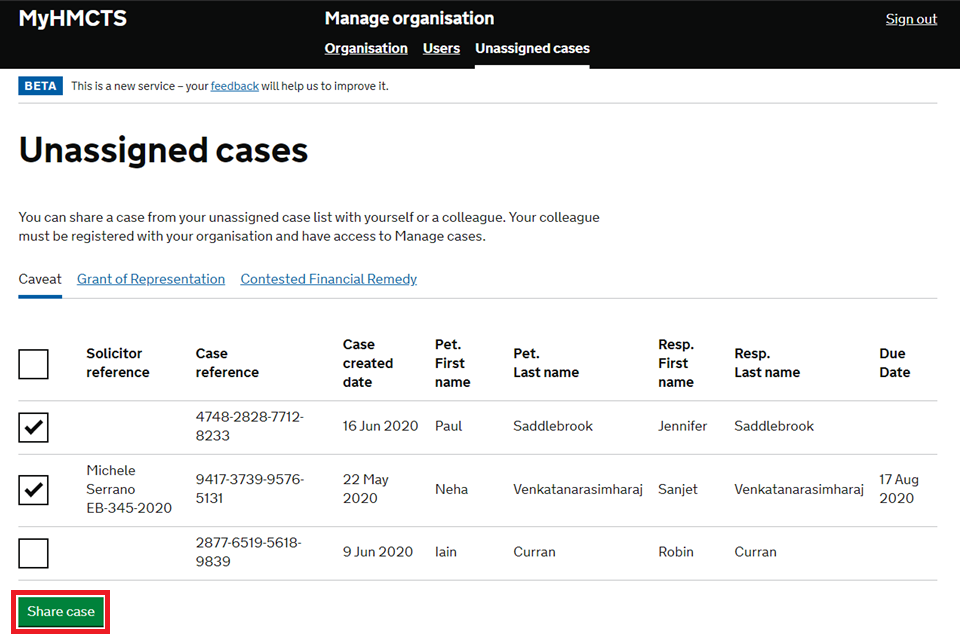
4. The ‘Add recipient’ screen will appear. Follow steps 2 and 3 in the Share a case section of this guide. These cases will be assigned and will no longer appear under the ‘unassigned case’ list.
5. View and manage assigned cases
You can only view assigned cases if you are a case access administrator (CAA). You can do this by signing in to manage organisation.
View assigned cases
1. Once you have signed in, select ‘Assigned cases’ from the header.
Cases are grouped by case type in separate tabs. The tabs you see will depend on what cases have been assigned to your firm.
2. Select the appropriate tab to show a list of cases. You will only be able to see basic case details.
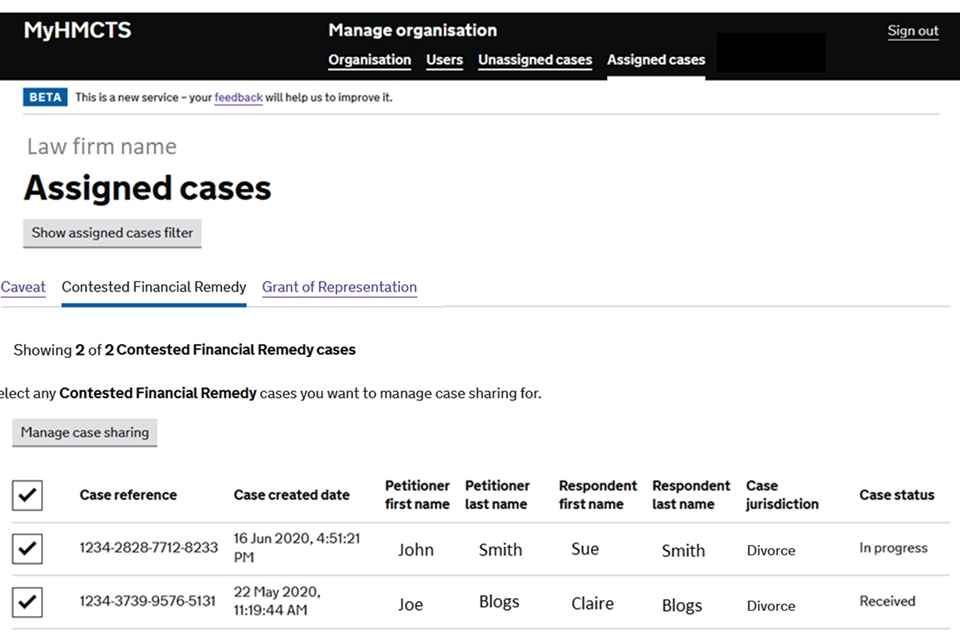
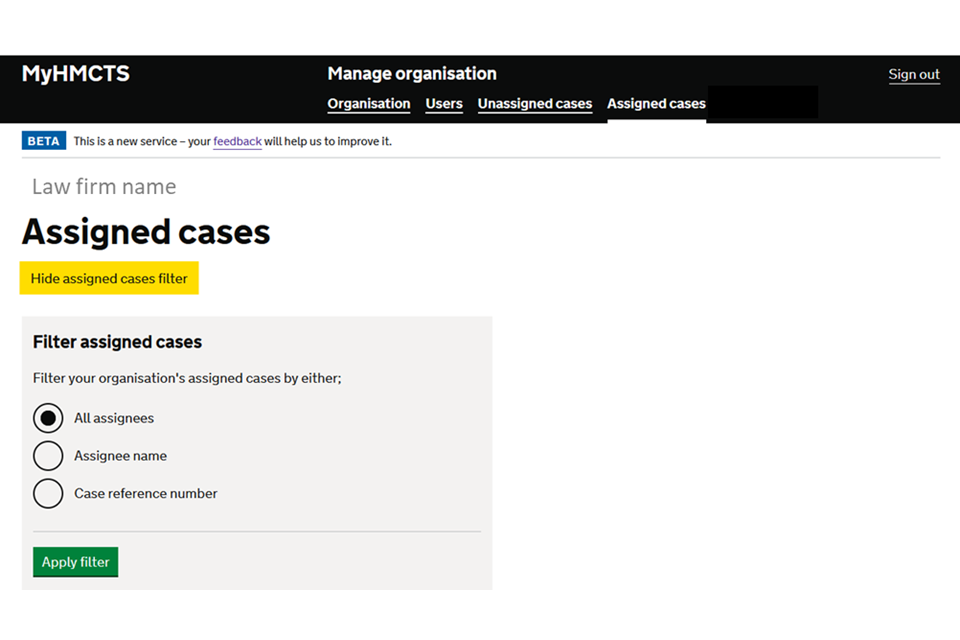
3. Select ‘Show assigned cases filter’ to filter by:
- All assignees – all assigned cases in your firm
- Assignee name – search and display all cases assigned to a user
- Case reference number – filter cases by the unique 16-digit case reference number if you are looking for a particular case
Manage assigned cases
You can add or remove colleagues’ access to an assigned case. You can manage unassigned cases from the ‘Unassigned cases’ tab.
1. Choose the case you want to manage access to by checking the box next to the case reference – you can check multiple boxes to manage more than one case at a time.
2. When you have checked all the cases you want to manage, select ‘Manage case sharing’.
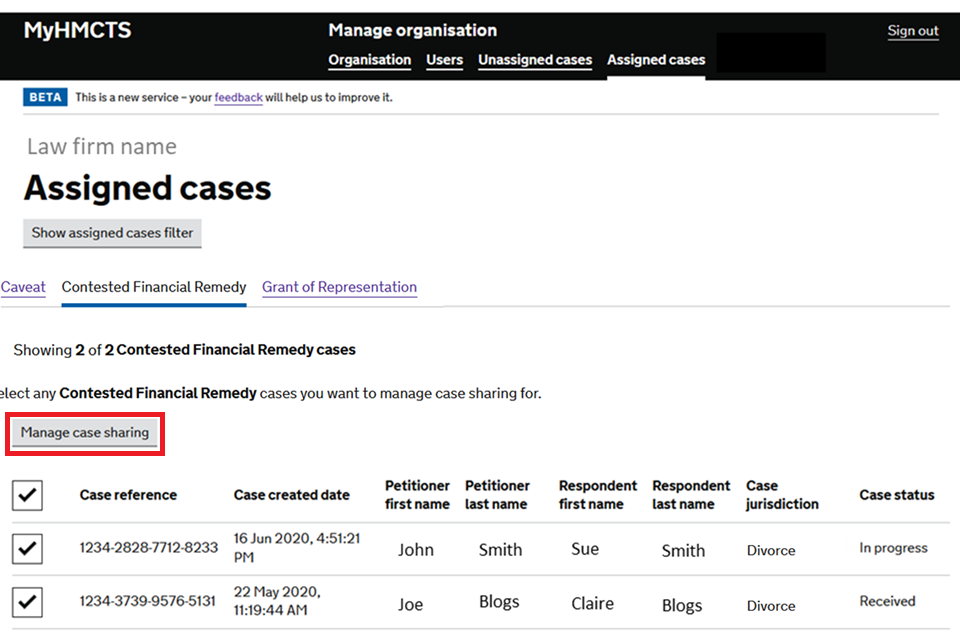
3. To add a colleague, search for their name or email address in the ‘Add people to share access to the selected cases’ section. Then select ‘Add’
4. To remove a colleague, search for their name or email address in the ‘Remove a person from all cases’ section. Then select ‘Remove’.
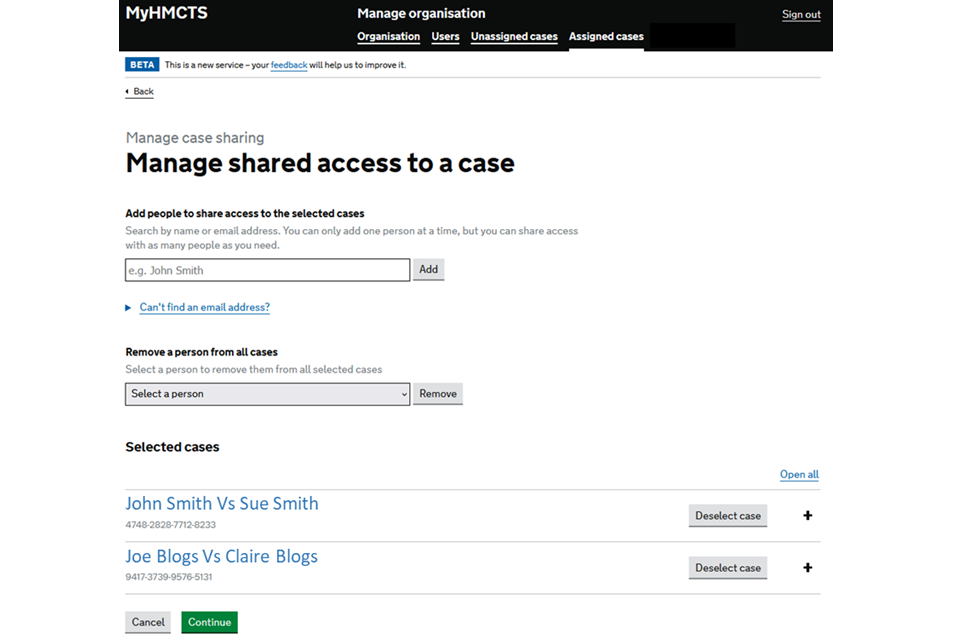
5. To see all the colleagues currently assigned, select ‘Open all’ or the + button for the appropriate case.
The colleagues you are adding will be listed and marked ‘To be added’.
The colleagues you are removing will be listed and marked ‘To be removed’.
6. You can cancel adding or removing colleagues by selecting ‘Cancel’.
7. You can also remove colleagues individually here by selecting ‘Remove’ in the ‘Actions’ column.
8. To cancel making all changes to a particular case, choose ‘Deselect case’.
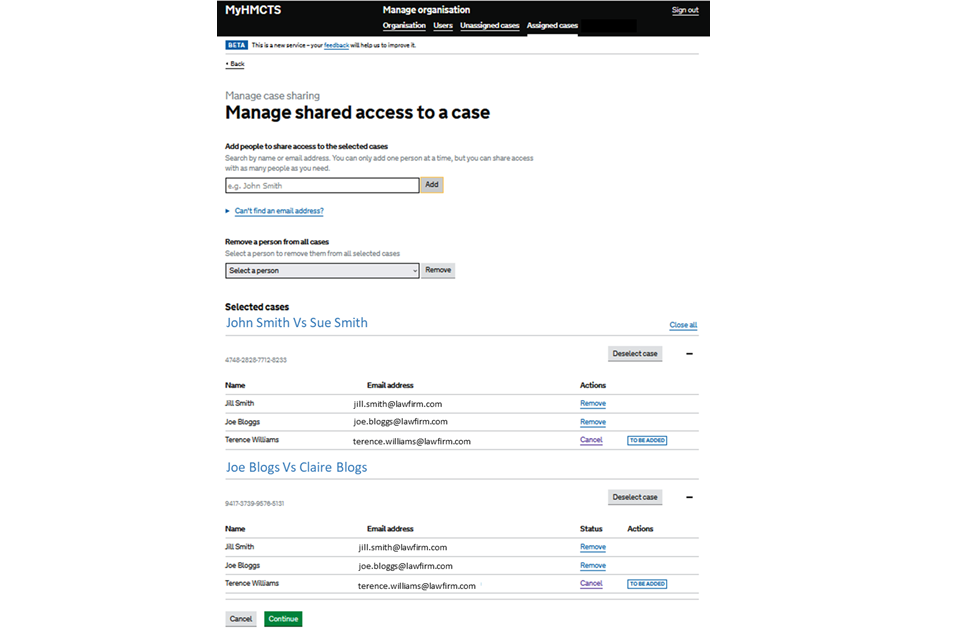
9. Once you are satisfied you are making the correct changes, select ‘Continue’ to move to the ‘Check and confirm your selection’ page.
10. Select ‘Change’ to make any further changes to a case.
11. Once satisfied all the changes are correct, select ‘Confirm’.
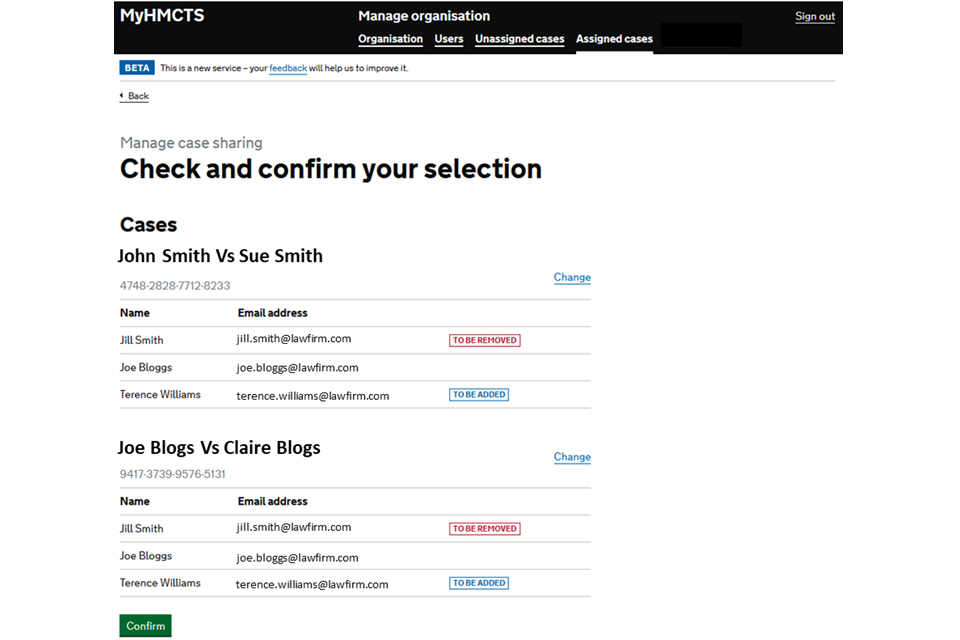
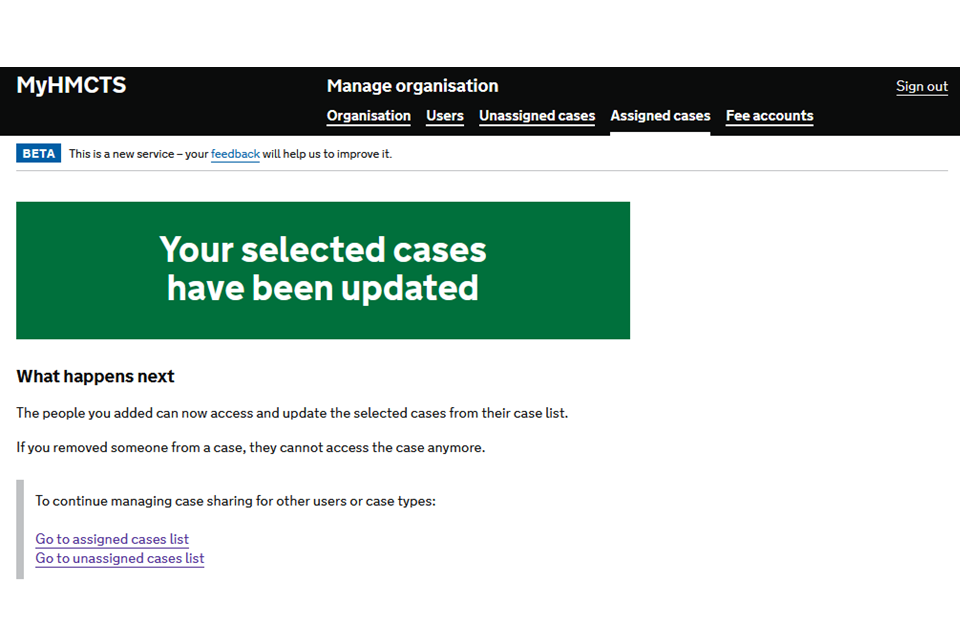
Your changes will be made immediately. You will see a confirmation screen, from where you can return to the assigned or unassigned case lists.
6. Get help with MyHMCTS
Managing cases and case access in MyHMCTS
If you need support with a particular case or with managing a case in MyHMCTS, see the appropriate service guidance to find out who to contact.
Find a list of links to service guidance in our guide on submitting or responding to an application.
Accessing and managing your MyHMCTS account
Find guidance for organisation and user administration tasks in MyHMCTS
If you are having trouble accessing MyHMCTS, make sure you are using the correct link:
-
to manage the organisation or a user’s account, or to view assigned and unassigned cases, use https://manage-org.platform.hmcts.net
-
to manage a case, use https://manage-case.platform.hmcts.net
You should also make sure you:
-
check your internet browser is up to date – we recommend you use Google Chrome or Microsoft Edge (you cannot use Internet Explorer or Apple Safari)
-
clear your cookies and your cache
-
check your firewall and security settings
We recommend that you bookmark or favourite MyHMCTS in your internet browser. You should only create the bookmark or favourite once you have signed in and are on the homepage. Do not create it from the sign in or verification pages, or while you have a case or organisation open.
If you are still having trouble accessing MyHMCTS, try using a different device to sign in.
If you have an IT support team, they will be able to help with any device, browser and security issues.
If you need additional support with your MyHMCTS account, email [email protected]. We aim to respond within 5 working days.
