Respond to a conditional order refusal
Updated 19 November 2024
Applies to England and Wales
This guide is for solicitors dealing with a divorce/dissolution under the new law. If your case was issued before April 2022 you should follow the previous guidance.
1. Before you start
Before you can use MyHMCTS, you and your organisation must have completed other steps:
1. Registered your organisation with MyHMCTS.
2. Set up your MyHMCTS user account.
Read the MyHMCTS registration guidance for further information and instructions. If your organisation has an account already, contact the existing administrator to arrange for your account creation.
Once you have a MyHMCTS account, you can sign in to manage a case using your email address and password.
Make sure you are using the solicitor portal, not the citizen portal. In MyHMCTS you can:
- manage your organisation from https://manage-org.platform.hmcts.net
- access your divorce application through https://manage-case.platform.hmcts.net
If you cannot find your organisation when entering your details or have issues registering with the service, contact [email protected] to make sure your organisation has been set up correctly.
This guidance is for responding to a refusal for a conditional order. You should also refer to the guidance for applying for a conditional order:
2. Find the refusal decision
When you apply for a conditional order, it will be reviewed by a legal adviser. The court will email you when the legal advisor has made a decision, and direct you to sign into your account for further details.
1. Follow the link in the email to sign into your account and go straight to the case to see the decision.
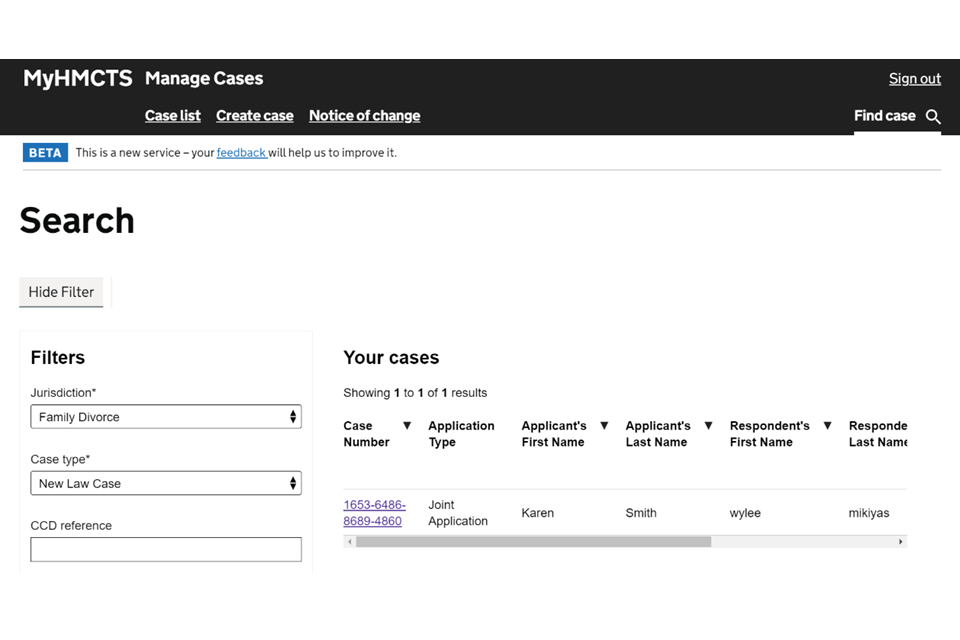
2. You can also use the ‘Find case’ functionality to manually search for the case. Select ‘Find case’ in the top right corner of the screen. Select these filters:
- Jurisdiction – Family Divorce
- Case Type – New Law Case
- CCD reference – your unique 16-digit case number
You can enter the CCD reference with or without the hyphens. Do not include any spaces at the front or end of the reference number.
3. Select ‘Apply’ to find the case. You can then select the case number link to open the case.
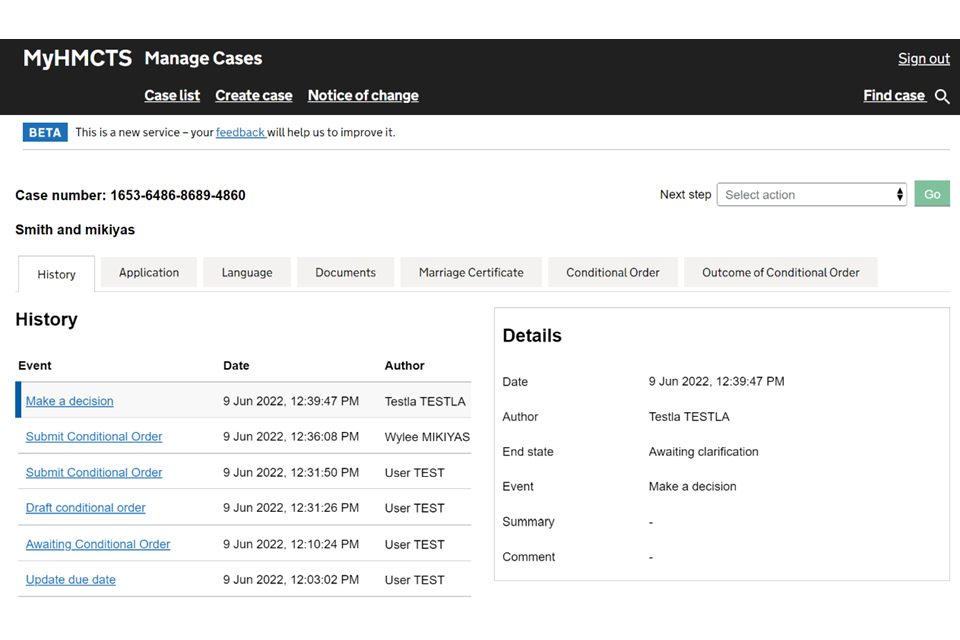
4. On the history screen you will see the latest case event is ‘Make a decision’ and the end state is ‘Awaiting clarification’.
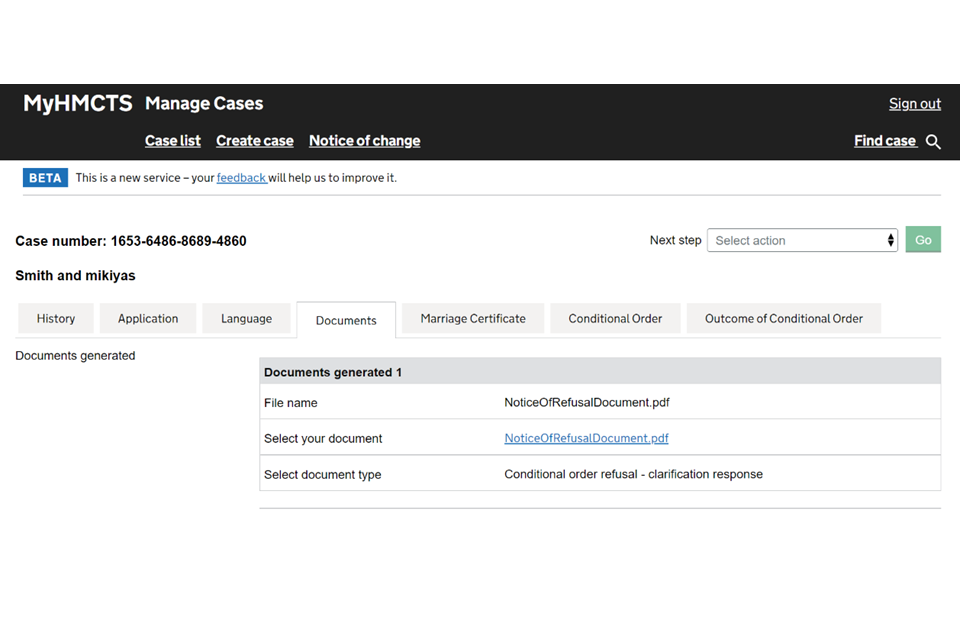
5. You can also see the notice of refusal document in the ‘Documents’ tab. Select the link to open the document. It will open in a new window.
3. Submit a clarification
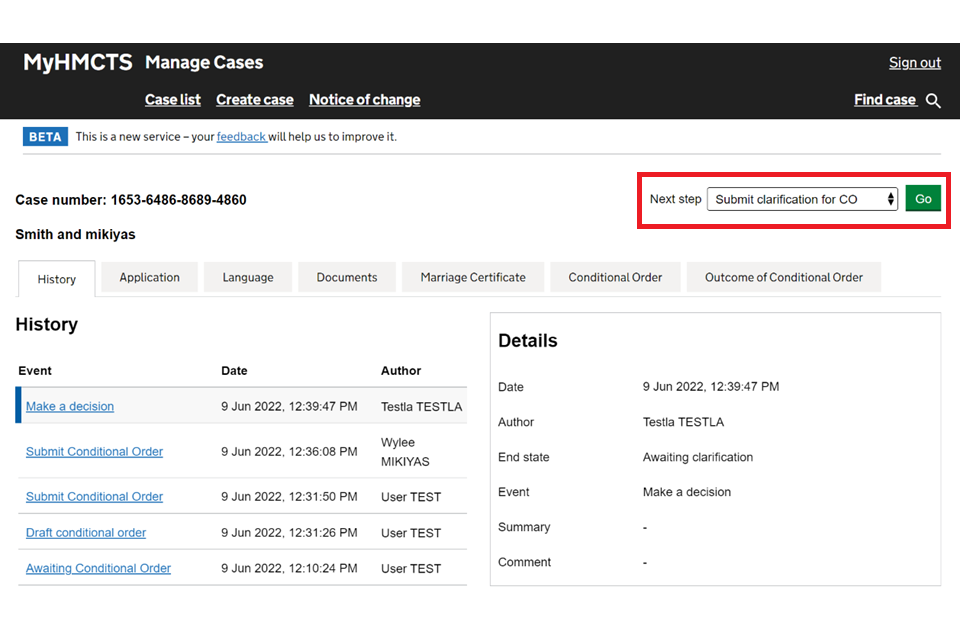
1. Select ‘Submit clarification for CO’ from the next step drop down. Then select ‘Go’.
2. The ‘Submit clarification for conditional order’ screen will appear. Select the link under ‘Refusal Rejection reasons’ to see the refusal document again.
3. You may also see a note about the reason for rejection from the legal advisor under ‘Clarification additional information (Translated)’.
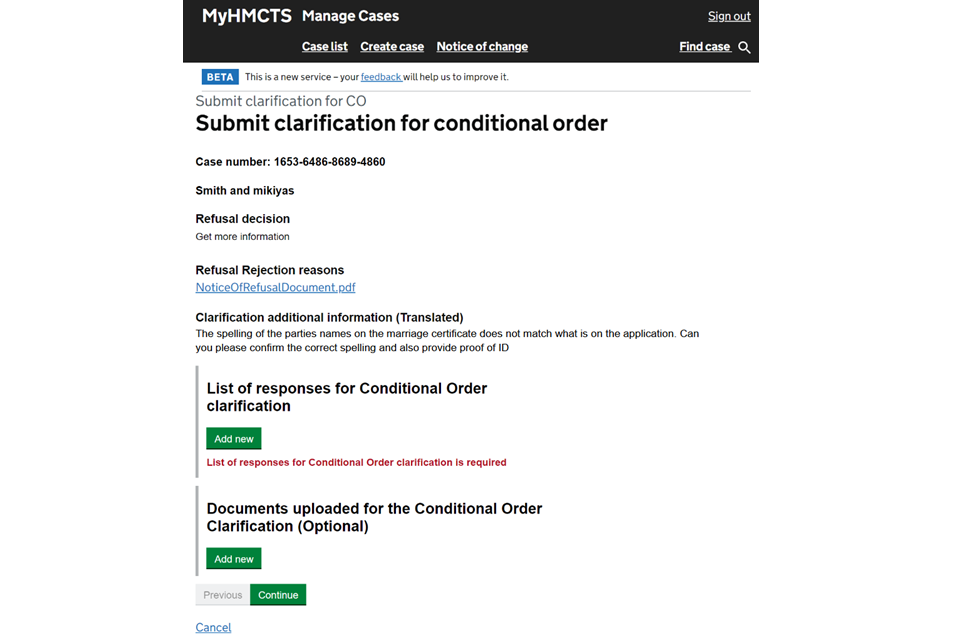
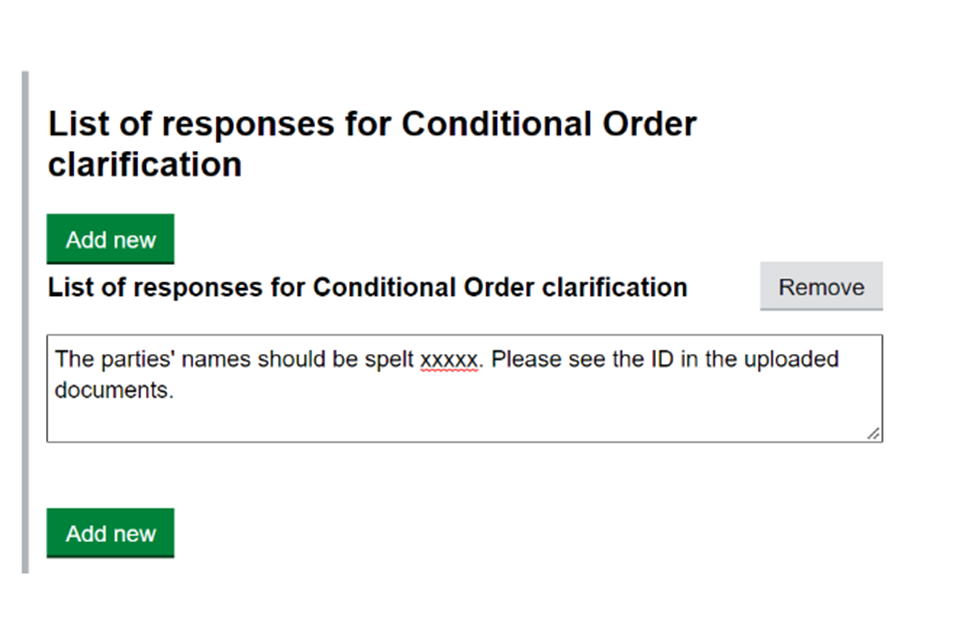
4. Under ‘List of responses for Conditional Order clarification’ select ‘Add new’ and write your clarification to the first reason given for the refusal. If there was more than one given, select ‘Add new’ again and write your next clarification. Add a clarification for each reason given.
5. If you need to add supporting documents, select ‘Add new’ under ‘Documents uploaded for the Conditional Order Clarification (Optional)’.
6. Add as many document details as necessary or you think useful. All the details are optional but adding comments, a file name and a date is useful.
7. Select ‘Choose file’ to browse for and upload the document.
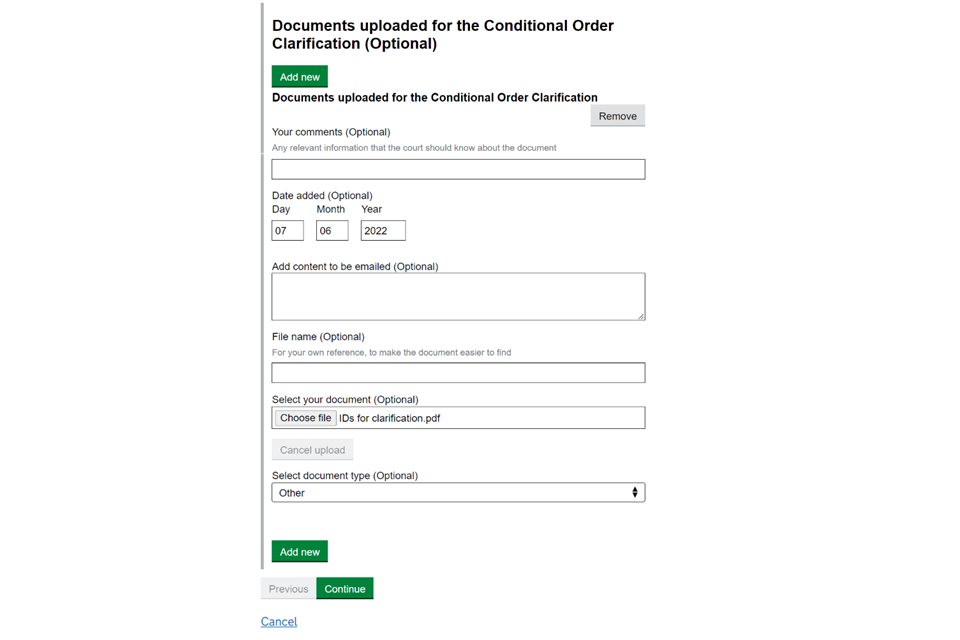
8. Once you have added all the information and documents, select ‘Continue’.
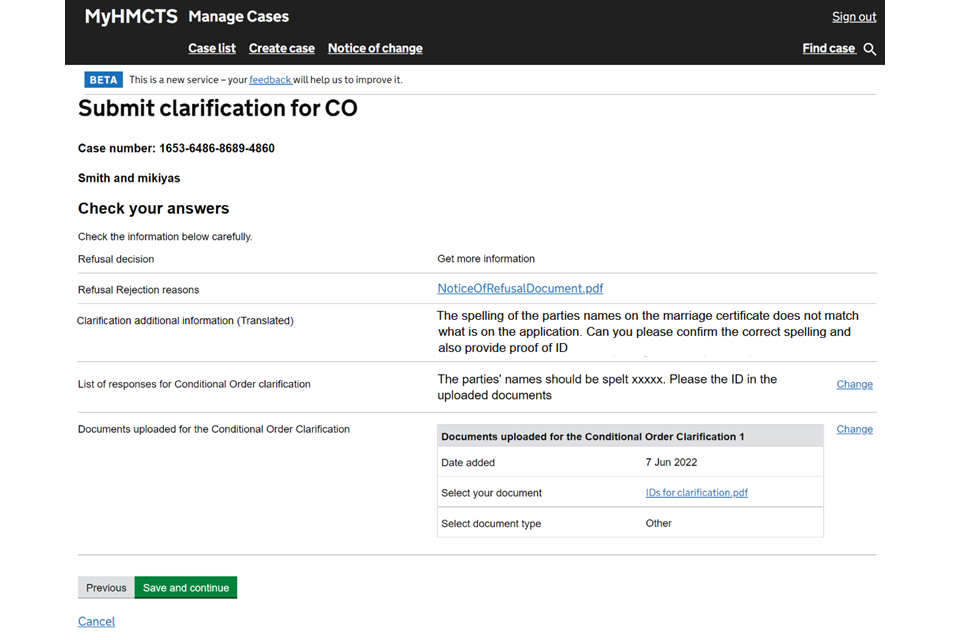
9. Check your answers. If you need to amend anything, select ‘Change’ and edit the answer appropriately. When all information is correct, select ‘Save and continue’.
10. You will see a green box at the top of the ‘History’ tab, with the case number and confirmation it has been updated with the event: Submit clarification for CO. You will also see ‘Submit clarification for CO’ in the list of events and in the ‘Details’ box that the End state is ‘Clarification response submitted’.
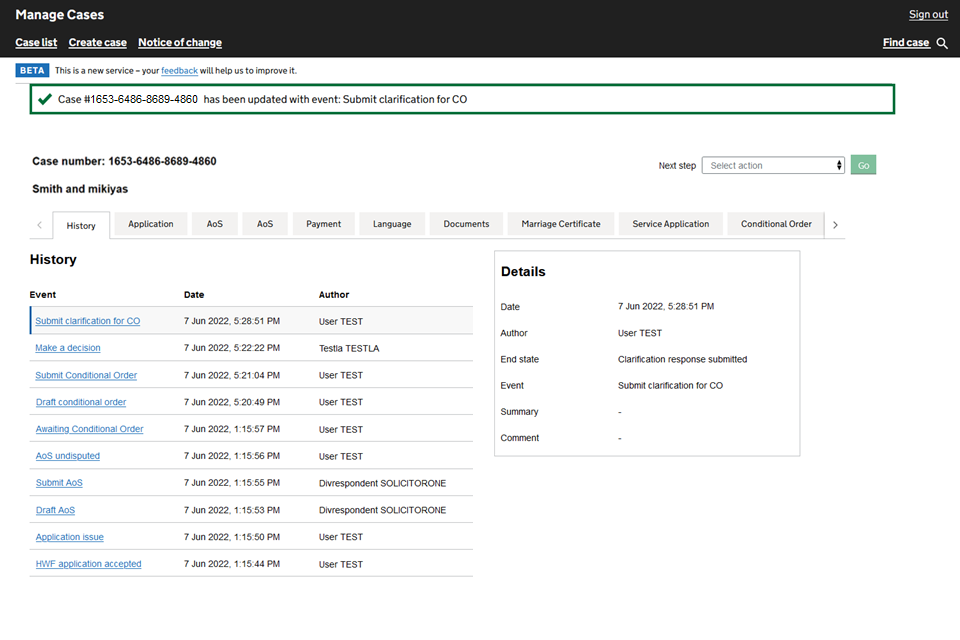
This will now go back to the legal advisor for review.
4. Submit an amended application
If the legal advisor refused the application and requested an amended application, they will give the reason the amendment is needed.
1. Open the case and select the ‘Documents’ tab.
2. Select the divorce application link.
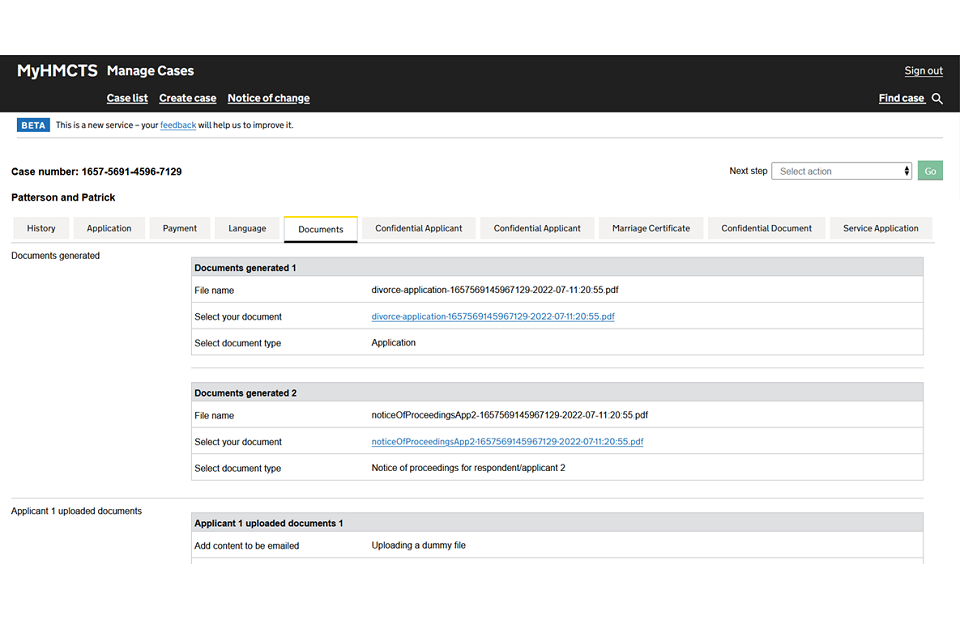
3. The application document will open in a new window. Select ‘More options’ and then ‘Download’.
4. You must amend the application by editing the digital copy or by printing it and editing by hand.
All edits and new text must be made in red text or ink – including the date and signature.
5. Write ‘Amended application’ at the top of the first page.
6. Put a line through the part of the application you are changing and add the new replacement information next to it.
7. Sign and date the application then post or email the application to:
HMCTS Divorce and Dissolution Service
PO Box 13226
Harlow
CM20 9UG
Email: [email protected]
The caseworker will upload the amended application to a new tab called ‘Amended application’. The court will take the amended application fee of £95 and pass the case to the judge for approval. The application will then be issued and you will be notified.
The court will send the respondent a new notice of proceedings, the paper amended application and the paper acknowledgement of service.
The case will become a paper case but will remain with the court and tribunal service centre (CTSC). You will need to send all following documents, including the conditional order and final order, to the CTSC by email or post.
You will lose access to the case digitally, so you will not be able to check the progress or add anything to the case on MyHMCTS – it will be a paper case with paper outputs.
5. Get help with MyHMCTS
Managing cases and case access in MyHMCTS
If you need support with case details or with managing a case in MyHMCTS, contact the court and tribunal service centre (CTSC):
Webchat
Telephone: 0300 303 0642
Monday to Friday, 10am to 6pm
Closed on bank holidays
Online form
Find guidance for case administration tasks in MyHMCTS
Accessing your MyHMCTS account
If you are having trouble accessing MyHMCTS, make sure you are using the correct link. To manage a case, you must use https://manage-case.platform.hmcts.net.
You should also make sure you:
- check your internet browser is up to date – we recommend you use Google Chrome or Microsoft Edge (you cannot use Internet Explorer or Apple Safari)
- clear your cookies and your cache
- check your firewall and security settings
We recommend that you bookmark or favourite MyHMCTS in your internet browser. You should only create the bookmark or favourite once you have signed in and are on the homepage. Do not create it from the sign in or verification pages, or while you have a case or organisation open.
If you are still having trouble accessing MyHMCTS, try using a different device to sign in.
If you have an IT support team, they will be able to help with any device, browser and security issues.
If you have an issue with your MyHMCTS account, you should contact an account administrator in your organisation.
If you need additional support with your MyHMCTS account, email [email protected]. We aim to respond within 5 working days.
